Well, I've been super busy over the last few days, and have been working on a special project that is going to be taking most of my, albeit limited, sculpting time....
So, rather than radio silence, I thought I'd post up some pictures of some scenery I made for my games.
 |
| I wish...... |
No, this is not one of mine (I wish it was!!), but this is the sort look I was going for. This is a shot of the Mourne Mountains in Northern Ireland, where they shot a lot of Game of Thrones, and I just love the "Heathcliff" look they provide. Here are a couple more very atmospheric shots....
 |
| Just the place for a little necrophilia.... |
 |
| It wasn't a bad view from the caravan... |
Now, before I post my own mediocre work, I should say, these were the first terrain pieces I had attempted in nearly twenty years (twenty!!!! God, just writing that makes me feel old!!). Anyway, I was inspired to do these by a fantastic article I read by the guys at
3T-Studios. Their work really is first rate, pop over to their website and take a look for yourself,
here is the article.
 |
| Planetary Guard advancing into combat |
There are a couple of things you may notice here, the first is that the hills sit flush to the table, one of my pet hates is that lip you get when you put scenery on a gaming table (I never claimed to be rational!!) - to get around this I made the scenery with an integral hexagonal base that could be connected to other scenery pieces to build up a variable playing surface, whilst avoiding the dreaded "lip of teeth-gnashing insanity"; the second is the individual hexagons themselves, these were used as open ground "fillers" between scenery pieces.
Here is a photo of a basic hexagon along with a couple more in various ground textures (in this case Marsh, Boulder and open ground).
 |
| Yes, cutting them took bloody ages!!! |
Here are a couple of photos of hills, made using the technique described by 3T-Studios
 |
| Simple polystyrene hill |
 |
| "Watchout for White Walkers, Private..." |
The hills themselves were simply carved from expanded polystyrene and mounted onto a 2mm Depron base (that I had glued to a sheet of magnetic paper and had already cut to the right hexagonal shape). For the large rocky outcrops, I used tree bark ground cover (that I purloined from my local children's play park when taking Sprout to play on the swings - shhhhhh, don't tell Cambridge County Council!!!!)
 |
| Shhhhhh, hide the evidence in that hill!! |
They were then coated in builders spackle (polyfiller), covered in sand and painted black.
 |
| "can't we just go round it, Sarge?" |
I then added a variety of sizes of rock (I found aquarium stones the best as 1. they are pretty cheap and come in big bags, 2. the stones in each bag are all around the same size, and 3. There is a wide variety of different sizes you can get). These were then also painted black.
All the plain ground areas were then dry-brushed in a variety of earth colours, whilst the rocks were done in a consistent variety of greys (to tie the whole look together).
Finally, I used a static flock applicator I bought from eBay to add the grass itself. I found that by adding one colour directly on top of the other in the applicators hopper, I could get a smooth transition between different areas of the hills that I wanted to colour differently.
Finally, a couple of coats of sainsbury's value hairspray to hold the grass in place and they were finished.
You'll notice I mounted the hills themselves on magnetic paper, "why?" I hear you ask.... Well, that's a good question, dear reader; you see, I found that things tended to move around in play, which was a right pain in the bum, so I picked up a couple of large magnetic white boards, fitted them together and placed the scenery on top; with the combination of the magnetic paper and friction of the surrounding hexagons, voila!! - problem solved, no more moving tiles (honestly, you could turn the boards upside down and nothing moved!!)
 |
| Difficult ground??? |
Here are a few more shots of that last one, just because it's my personal favourite...
 |
| My personal favourite |
Obviously, most gaming tables will need more than mere hills, so I made a few other pieces to add some variety, here are some stone columns and rocky outcrops...
 |
| Definatly not phallic at all.... |
 |
| Rocky outcrops provide great cover |
And for trees, I simply fitted a ready-made model railway tree to a hexagon...
 |
| Simple trees, DIY forests |
Whilst the hexagons allowed each piece to be placed in a number of positions (6, obviously!), there was, of course no way to change the scenery itself....
"Pah!", say I..... "Ye of little faith!!!!".....
I overcame this obstacle on a number of pieces by building a base hill and fitting it with hexagon ports that could be either filled with plain tiles (see above) or fitted with other, more interesting items, as you can see here.... (first photo is simply with the plain tiles in place)
 |
| Hill ports add extra options to customise |
Here are a couple more shots of the boards in action....
 |
| The scenic route.... |
 |
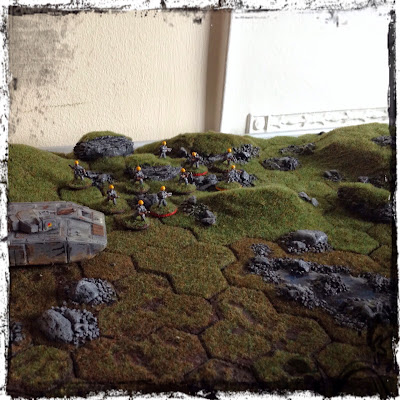
| Planetary Guard advance with tank support |
Finally, whilst I've used 15mm miniatures for the photos, these could easily be used for different scales. Just to prove I'm not 15mm obsessed, here are some snaps of a 28mm graveyard I built for a friend....
 |
| Not somewhere to be after dark..... |
 |
| Removable graves and different views |
 |
| Close up of the graves |
I know it's been a long post, dear reader (if you've made it this far, well done!!), but I hoped you've liked it... Now, I best get on, that special project won't sculpt itself....
All the best
FC
Labels: Terrain


